一、本文介绍
本文给大家带来的改进机制是 MobileNetV3 ,其主要改进思想集中在结合 硬件 感知的网络架构搜索( NAS )和NetAdapt算法,以优化移动设备CPU上的性能。它采用了新颖的架构设计,包括反转残差结构和线性瓶颈层,以及新的高效分割解码器Lite Reduced Atrous Spatial Pyramid Pooling(LR-ASPP),以提升在移动分类、检测和分割任务上的表现。实验表明,MobileNets在资源和准确性的权衡方面表现出色, 并在多种应用(如对象检测、细粒度分类、面部属性识别和大规模地理定位)中展现了其有效性, (yolov11全系列轻量化)。

二、MobileNetV3的框架原理

官方论文地址: 官方论文地址点击即可跳转
官方代码地址: 官方代码地址

MobileNetV3的主要改进思想 集中在结合硬件感知的网络架构搜索(NAS)和NetAdapt 算法 ,以优化移动设备CPU上的性能。它采用了新颖的架构设计,包括反转残差结构和线性瓶颈层,以及新的高效分割解码器Lite Reduced Atrous Spatial Pyramid Pooling(LR-ASPP),以提升在移动分类、检测和分割任务上的表现。这些改进通过精心设计的轻量级架构,实现了更高的准确度、更低的延迟,并在不同的资源使用场景中实现了更好的性能。
MobileNetV3的主要创新点包括:
1. 结合了硬件感知的网络架构搜索(NAS)和NetAdapt算法,针对移动设备CPU进行优化。
2. 引入了新颖的架构设计,包括反转残差结构和线性瓶颈层。
3. 提出了高效的Lite Reduced Atrous Spatial Pyramid Pooling(LR-ASPP)作为新的分割解码器。
2.1 NAS和NetAdapt算法
MobileNetV3采用了硬件感知的网络架构搜索(NAS)和NetAdapt算法,这两种技术相互补充,可以结合起来有效地为特定硬件平台找到优化的 模型 。特别是,它采用了平台感知NAS进行块级搜索,类似于之前的MnasNet-A1方法,使用相同的基于RNN的控制器和相同的分解层次搜索空间,以便为大型移动模型找到全局网络结构,目标是大约80ms的延迟。然后在此基础上应用NetAdapt算法和其他优化措施。这种方法允许在顺序方式中对单个层进行微调,而不是尝试推断粗略但全局的架构。NetAdapt的第二个技术是用于层级搜索,它更适用于小型移动模型,因为对于小型模型来说,准确性随着延迟的变化更加显著,因此需要一个较小的权重因子w = -0.15来补偿不同延迟下的较大准确性变化。通过这个新的权重因子,我们从头开始一个新的架构搜索,以找到初始种子模型,然后应用NetAdapt和其他优化来获得最终的MobileNetV3-Small模型
2.2 反转残差结构和线性瓶颈层
MobileNetV3在架构上进行了一些修改,以降低某些较慢层的延迟,同时保持准确性。这些修改超出了当前搜索空间的范围。第一项修改重新设计了网络的最后几层是如何相互作用以更有效地生成最终特征的。基于MobileNetV2的反转瓶颈结构的当前模型在最终层使用1x1卷积以扩展到更高维的特征空间。这一层对于预测中拥有丰富的特征至关重要。然而,这也增加了额外的延迟。为了减少延迟并保留高维特征,我们将这一层移到最终的平均池化之后

上图展示了MobileNetV2和MobileNetV3的网络结构层。
上侧 (MobileNetV2层): 展示了反转残差和线性瓶颈结构。每个块由狭窄的输入和输出层组成,这些层没有非线性操作,后面跟着扩展到更高维空间并投影到输出的操作。残差连接连接了瓶颈层,而不是扩展层。
下侧 (MobileNetV2 + Squeeze-and-Excite): 展示了与Squeeze-and-Excite层一起使用的MobileNetV3。与先前不同,在残差层中应用了挤压和激励操作。
三、MobileNetV3的核心代码
下面的代码是整个MobileNetV1的核心代码,大家如果想学习可以和上面的框架原理对比着看一看估计会有一定的收获,使用方式看章节四。
- """A from-scratch implementation of MobileNetV3 paper ( for educational purposes ).
- Paper
- Searching for MobileNetV3 - https://arxiv.org/abs/1905.02244v5
- author : [email protected]
- """
- import torch
- from torch import nn
- __all__ = ['MobileNetV3_large_n', 'MobileNetV3_large_s', 'MobileNetV3_large_m', 'MobileNetV3_small_n', 'MobileNetV3_small_s', 'MobileNetV3_small_m']
- class SqueezeExitationBlock(nn.Module):
- def __init__(self, in_channels: int):
- """Constructor for SqueezeExitationBlock.
- Args:
- in_channels (int): Number of input channels.
- """
- super().__init__()
- self.pool1 = nn.AdaptiveAvgPool2d(1)
- self.linear1 = nn.Linear(
- in_channels, in_channels // 4
- ) # divide by 4 is mentioned in the paper, 5.3. Large squeeze-and-excite
- self.act1 = nn.ReLU()
- self.linear2 = nn.Linear(in_channels // 4, in_channels)
- self.act2 = nn.Hardsigmoid()
- def forward(self, x):
- """Forward pass for SqueezeExitationBlock."""
- identity = x
- x = self.pool1(x)
- x = torch.flatten(x, 1)
- x = self.linear1(x)
- x = self.act1(x)
- x = self.linear2(x)
- x = self.act2(x)
- x = identity * x[:, :, None, None]
- return x
- class ConvNormActivationBlock(nn.Module):
- def __init__(
- self,
- in_channels: int,
- out_channels: int,
- kernel_size: list,
- stride: int = 1,
- padding: int = 0,
- groups: int = 1,
- bias: bool = False,
- activation: torch.nn = nn.Hardswish,
- ):
- """Constructs a block containing a convolution, batch normalization and activation layer
- Args:
- in_channels (int): number of input channels
- out_channels (int): number of output channels
- kernel_size (list): size of the convolutional kernel
- stride (int, optional): stride of the convolutional kernel. Defaults to 1.
- padding (int, optional): padding of the convolutional kernel. Defaults to 0.
- groups (int, optional): number of groups for depthwise seperable convolution. Defaults to 1.
- bias (bool, optional): whether to use bias. Defaults to False.
- activation (torch.nn, optional): activation function. Defaults to nn.Hardswish.
- """
- super().__init__()
- self.conv = nn.Conv2d(
- in_channels,
- out_channels,
- kernel_size,
- stride=stride,
- padding=padding,
- groups=groups,
- bias=bias,
- )
- self.norm = nn.BatchNorm2d(out_channels)
- self.activation = activation()
- def forward(self, x):
- """Perform forward pass."""
- x = self.conv(x)
- x = self.norm(x)
- x = self.activation(x)
- return x
- class InverseResidualBlock(nn.Module):
- def __init__(
- self,
- in_channels: int,
- out_channels: int,
- kernel_size: int,
- expansion_size: int = 6,
- stride: int = 1,
- squeeze_exitation: bool = True,
- activation: nn.Module = nn.Hardswish,
- ):
- """Constructs a inverse residual block
- Args:
- in_channels (int): number of input channels
- out_channels (int): number of output channels
- kernel_size (int): size of the convolutional kernel
- expansion_size (int, optional): size of the expansion factor. Defaults to 6.
- stride (int, optional): stride of the convolutional kernel. Defaults to 1.
- squeeze_exitation (bool, optional): whether to add squeeze and exitation block or not. Defaults to True.
- activation (nn.Module, optional): activation function. Defaults to nn.Hardswish.
- """
- super().__init__()
- self.residual = in_channels == out_channels and stride == 1
- self.squeeze_exitation = squeeze_exitation
- self.conv1 = (
- ConvNormActivationBlock(
- in_channels, expansion_size, (1, 1), activation=activation
- )
- if in_channels != expansion_size
- else nn.Identity()
- ) # If it's not the first layer, then we need to add a 1x1 convolutional layer to expand the number of channels
- self.depthwise_conv = ConvNormActivationBlock(
- expansion_size,
- expansion_size,
- (kernel_size, kernel_size),
- stride=stride,
- padding=kernel_size // 2,
- groups=expansion_size,
- activation=activation,
- )
- if self.squeeze_exitation:
- self.se = SqueezeExitationBlock(expansion_size)
- self.conv2 = nn.Conv2d(
- expansion_size, out_channels, (1, 1), bias=False
- ) # bias is false because we are using batch normalization, which already has bias
- self.norm = nn.BatchNorm2d(out_channels)
- def forward(self, x):
- """Perform forward pass."""
- identity = x
- x = self.conv1(x)
- x = self.depthwise_conv(x)
- if self.squeeze_exitation:
- x = self.se(x)
- x = self.conv2(x)
- x = self.norm(x)
- if self.residual:
- x = x + identity
- return x
- class MobileNetV3(nn.Module):
- def __init__(
- self,
- input_channel: int = 3,
- config: str = "small",
- depth_multiplier: float = 1,
- ):
- """Constructs MobileNetV3 architecture
- Args:
- `n_classes`: An integer count of output neuron in last layer, default 1000
- `input_channel`: An integer value input channels in first conv layer, default is 3.
- `config`: A string value indicating the configuration of MobileNetV3, either `large` or `small`, default is `large`.
- `dropout` [0, 1] : A float parameter for dropout in last layer, between 0 and 1, default is 0.8.
- """
- super().__init__()
- # The configuration of MobileNetv3.
- # input channels, kernel size, expension size, output channels, squeeze exitation, activation, stride
- RE = nn.ReLU
- HS = nn.Hardswish
- configs_dict = {
- "small": (
- (16, 3, 16, 16, True, RE, 2),
- (16, 3, 72, 24, False, RE, 2),
- (24, 3, 88, 24, False, RE, 1),
- (24, 5, 96, 40, True, HS, 2),
- (40, 5, 240, 40, True, HS, 1),
- (40, 5, 240, 40, True, HS, 1),
- (40, 5, 120, 48, True, HS, 1),
- (48, 5, 144, 48, True, HS, 1),
- (48, 5, 288, 96, True, HS, 2),
- (96, 5, 576, 96, True, HS, 1),
- (96, 5, 576, 96, True, HS, 1),
- ),
- "large": (
- (16, 3, 16, 16, False, RE, 1),
- (16, 3, 64, 24, False, RE, 2),
- (24, 3, 72, 24, False, RE, 1),
- (24, 5, 72, 40, True, RE, 2),
- (40, 5, 120, 40, True, RE, 1),
- (40, 5, 120, 40, True, RE, 1),
- (40, 3, 240, 80, False, HS, 2),
- (80, 3, 200, 80, False, HS, 1),
- (80, 3, 184, 80, False, HS, 1),
- (80, 3, 184, 80, False, HS, 1),
- (80, 3, 480, 112, True, HS, 1),
- (112, 3, 672, 112, True, HS, 1),
- (112, 5, 672, 160, True, HS, 2),
- (160, 5, 960, 160, True, HS, 1),
- (160, 5, 960, 160, True, HS, 1),
- ),
- }
- # 使用列表存储所有层
- layers = [
- ConvNormActivationBlock(
- input_channel, int(16 * depth_multiplier), (3, 3), stride=2, padding=1, activation=nn.Hardswish
- )
- ]
- # 遍历配置并添加 InverseResidualBlock 层
- for (
- in_channels,
- kernel_size,
- expansion_size,
- out_channels,
- squeeze_exitation,
- activation,
- stride,
- ) in configs_dict[config]:
- layers.append(
- InverseResidualBlock(
- in_channels=int(in_channels * depth_multiplier),
- out_channels=int(out_channels * depth_multiplier),
- kernel_size=kernel_size,
- expansion_size=expansion_size,
- stride=stride,
- squeeze_exitation=squeeze_exitation,
- activation=activation,
- )
- )
- # 根据配置和 depth_multiplier 放缩 hidden_channels 和 _out_channel
- hidden_channels = int((576 if config == "small" else 960) * depth_multiplier)
- _out_channel = int((1024 if config == "small" else 1280) * depth_multiplier)
- # 最后添加一个 ConvNormActivationBlock 层
- layers.append(
- ConvNormActivationBlock(
- int(out_channels * depth_multiplier), # 确保通道数放缩
- hidden_channels,
- kernel_size=(1, 1),
- bias=False,
- activation=nn.Hardswish,
- )
- )
- # 将层列表转换为 nn.Sequential
- self.model = nn.Sequential(*layers)
- self.width_list = [i.size(1) for i in self.forward(torch.randn(1, 3, 640, 640))]
- def forward(self, x):
- """Perform forward pass."""
- unique_tensors = {}
- for model in self.model:
- x = model(x)
- width, height = x.shape[2], x.shape[3]
- unique_tensors[(width, height)] = x
- result_list = list(unique_tensors.values())[-4:]
- return result_list
- def MobileNetV3_small_n():
- model = MobileNetV3(config='small',depth_multiplier=0.25)
- return model
- def MobileNetV3_small_s():
- model = MobileNetV3(config='small',depth_multiplier=0.5)
- return model
- def MobileNetV3_small_m():
- model = MobileNetV3(config='small',depth_multiplier=1)
- return model
- def MobileNetV3_large_n():
- model = MobileNetV3(config='large',depth_multiplier=0.25)
- return model
- def MobileNetV3_large_s():
- model = MobileNetV3(config='large',depth_multiplier=0.5)
- return model
- def MobileNetV3_large_m():
- model = MobileNetV3(config='large',depth_multiplier=1)
- return model
- if __name__ == "__main__":
- # Generating Sample image
- image_size = (1, 3, 640, 640)
- image = torch.rand(*image_size)
- # Model
- mobilenet_v3 = MobileNetV3_large_M()
- out = mobilenet_v3(image)
- print(out)
四、手把手教你添加 MobileNetV3网络结构
4.1 修改一
第一步还是建立文件,我们找到如下 ultralytics /nn文件夹下建立一个目录名字呢就是'Addmodules'文件夹( 用群内的文件的话已经有了无需新建) !然后在其内部建立一个新的py文件将核心代码复制粘贴进去即可

4.2 修改二
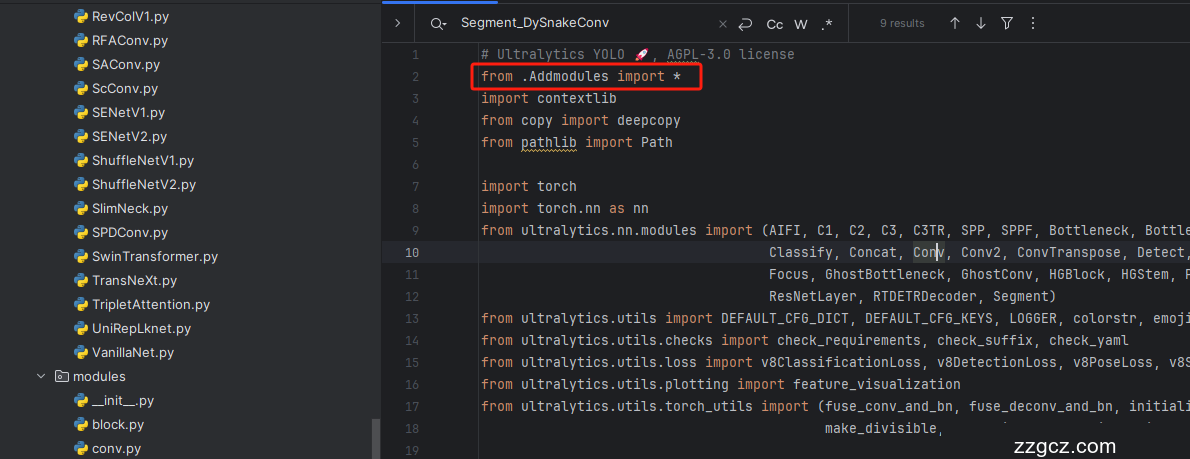
第二步我们在该目录下创建一个新的py文件名字为'__init__.py'( 用群内的文件的话已经有了无需新建) ,然后在其内部导入我们的检测头如下图所示。
4.3 修改三
第三步我门中到如下文件'ultralytics/nn/tasks.py'进行导入和注册我们的模块( 用群内的文件的话已经有了无需重新导入直接开始第四步即可) !
从今天开始以后的教程就都统一成这个样子了,因为我默认大家用了我群内的文件来进行修改!!
4.4 修改四
添加如下两行代码!!!

4.5 修改五
找到七百多行大概把具体看图片,按照图片来修改就行,添加红框内的部分,注意没有()只是函数名。
- elif m in {MobileNetV3_large_n, MobileNetV3_large_s, MobileNetV3_large_m, MobileNetV3_small_n, MobileNetV3_small_s, MobileNetV3_small_m}:
- m = m(*args)
- c2 = m.width_list # 返回通道列表
- backbone = True
4.6 修改六
下面的两个红框内都是需要改动的。

- if isinstance(c2, list):
- m_ = m
- m_.backbone = True
- else:
- m_ = nn.Sequential(*(m(*args) for _ in range(n))) if n > 1 else m(*args) # module
- t = str(m)[8:-2].replace('__main__.', '') # module type
- m.np = sum(x.numel() for x in m_.parameters()) # number params
- m_.i, m_.f, m_.type = i + 4 if backbone else i, f, t # attach index, 'from' index, type
4.7 修改七
修改七和前面的都不太一样,需要修改前向传播中的一个部分, 已经离开了parse_model方法了。
可以在图片中开代码行数,没有离开task.py文件都是同一个文件。 同时这个部分有好几个前向传播都很相似,大家不要看错了, 是70多行左右的!!!,同时我后面提供了代码,大家直接复制粘贴即可,有时间我针对这里会出一个视频。

代码如下->
- def _predict_once(self, x, profile=False, visualize=False, embed=None):
- """
- Perform a forward pass through the network.
- Args:
- x (torch.Tensor): The input tensor to the model.
- profile (bool): Print the computation time of each layer if True, defaults to False.
- visualize (bool): Save the feature maps of the model if True, defaults to False.
- embed (list, optional): A list of feature vectors/embeddings to return.
- Returns:
- (torch.Tensor): The last output of the model.
- """
- y, dt, embeddings = [], [], [] # outputs
- for m in self.model:
- if m.f != -1: # if not from previous layer
- x = y[m.f] if isinstance(m.f, int) else [x if j == -1 else y[j] for j in m.f] # from earlier layers
- if profile:
- self._profile_one_layer(m, x, dt)
- if hasattr(m, 'backbone'):
- x = m(x)
- if len(x) != 5: # 0 - 5
- x.insert(0, None)
- for index, i in enumerate(x):
- if index in self.save:
- y.append(i)
- else:
- y.append(None)
- x = x[-1] # 最后一个输出传给下一层
- else:
- x = m(x) # run
- y.append(x if m.i in self.save else None) # save output
- if visualize:
- feature_visualization(x, m.type, m.i, save_dir=visualize)
- if embed and m.i in embed:
- embeddings.append(nn.functional.adaptive_avg_pool2d(x, (1, 1)).squeeze(-1).squeeze(-1)) # flatten
- if m.i == max(embed):
- return torch.unbind(torch.cat(embeddings, 1), dim=0)
- return x
到这里就完成了修改部分,但是这里面细节很多,大家千万要注意不要替换多余的代码,导致报错,也不要拉下任何一部,都会导致运行失败,而且报错很难排查!!!很难排查!!!
注意!!! 额外的修改!
关注我的其实都知道,我大部分的修改都是一样的,这个网络需要额外的修改一步,就是s一个参数,将下面的s改为640!!!即可完美运行!!

打印计算量问题解决方案
我们找到如下文件'ultralytics/utils/torch_utils.py'按照如下的图片进行修改,否则容易打印不出来计算量。

注意事项!!!
如果大家在验证的时候报错形状不匹配的错误可以固定验证集的图片尺寸,方法如下 ->
找到下面这个文件ultralytics/ models /yolo/detect/train.py然后其中有一个类是DetectionTrainer class中的build_dataset函数中的一个参数rect=mode == 'val'改为rect=False

五、MobileNetV2的yaml文件
5.1 yaml文件
训练信息:YOLO11-MobileNetV3 summary: 432 layers, 1,630,183 parameters, 1,630,167 gradients, 3.9 GFLOPs
# 我提供了六个版本分别是对应YOLOv8n v8s v8m。 'MobileNetV3_large_n', 'MobileNetV3_large_s', 'MobileNetV3_large_m', 'MobileNetV3_small_n', 'MobileNetV3_small_s', 'MobileNetV3_small_m'
# 其中n是对应yolo的版本通道放缩 large 和 small 是模型官方本身自带的版本
- # Ultralytics YOLO 🚀, AGPL-3.0 license
- # YOLO11 object detection model with P3-P5 outputs. For Usage examples see https://docs.ultralytics.com/tasks/detect
- # Parameters
- nc: 80 # number of classes
- scales: # model compound scaling constants, i.e. 'model=yolo11n.yaml' will call yolo11.yaml with scale 'n'
- # [depth, width, max_channels]
- n: [0.50, 0.25, 1024] # summary: 319 layers, 2624080 parameters, 2624064 gradients, 6.6 GFLOPs
- s: [0.50, 0.50, 1024] # summary: 319 layers, 9458752 parameters, 9458736 gradients, 21.7 GFLOPs
- m: [0.50, 1.00, 512] # summary: 409 layers, 20114688 parameters, 20114672 gradients, 68.5 GFLOPs
- l: [1.00, 1.00, 512] # summary: 631 layers, 25372160 parameters, 25372144 gradients, 87.6 GFLOPs
- x: [1.00, 1.50, 512] # summary: 631 layers, 56966176 parameters, 56966160 gradients, 196.0 GFLOPs
- # 我提供了六个版本分别是对应YOLOv8n v8s v8m。 'MobileNetV3_large_n', 'MobileNetV3_large_s', 'MobileNetV3_large_m', 'MobileNetV3_small_n', 'MobileNetV3_small_s', 'MobileNetV3_small_m'
- # 其中n是对应yolo的版本通道放缩 large 和 small 是模型官方本身自带的版本
- # YOLO11n backbone
- backbone:
- # [from, repeats, module, args]
- - [-1, 1, MobileNetV2_n, []] # 0-4 P1/2 这里是四层大家不要被yaml文件限制住了思维,不会画图进群看视频.
- - [-1, 1, SPPF, [1024, 5]] # 5
- - [-1, 2, C2PSA, [1024]] # 6
- # YOLO11n head
- head:
- - [-1, 1, nn.Upsample, [None, 2, "nearest"]]
- - [[-1, 3], 1, Concat, [1]] # cat backbone P4
- - [-1, 2, C3k2, [512, False]] # 9
- - [-1, 1, nn.Upsample, [None, 2, "nearest"]]
- - [[-1, 2], 1, Concat, [1]] # cat backbone P3
- - [-1, 2, C3k2, [256, False]] # 12 (P3/8-small)
- - [-1, 1, Conv, [256, 3, 2]]
- - [[-1, 9], 1, Concat, [1]] # cat head P4
- - [-1, 2, C3k2, [512, False]] # 15 (P4/16-medium)
- - [-1, 1, Conv, [512, 3, 2]]
- - [[-1, 6], 1, Concat, [1]] # cat head P5
- - [-1, 2, C3k2, [1024, True]] # 18 (P5/32-large)
- - [[12, 15, 18], 1, Detect, [nc]] # Detect(P3, P4, P5)
5.2 训练文件的代码
可以复制我的运行文件进行运行。
- import warnings
- warnings.filterwarnings('ignore')
- from ultralytics import YOLO
- if __name__ == '__main__':
- model = YOLO("替换你的yaml文件地址")
- model.load('yolov8n.pt')
- model.train(data=r'你的数据集的地址',
- cache=False,
- imgsz=640,
- epochs=150,
- batch=4,
- close_mosaic=0,
- workers=0,
- device=0,
- optimizer='SGD'
- amp=False,
- )
六、成功运行记录
下面是成功运行的截图,已经完成了有1个epochs的训练,图片太大截不全第2个epochs了。
七、本文总结
到此本文的正式分享内容就结束了,在这里给大家推荐我的YOLOv11改进有效涨点专栏,本专栏目前为新开的平均质量分98分,后期我会根据各种最新的前沿顶会进行论文复现,也会对一些老的改进机制进行补充 , 如果大家觉得本文帮助到你了,订阅本专栏,关注后续更多的更新~
